Krippled Anchovy
Rigging Krippled Anchovy (4 to 6 Inch Baitfish)
 Figure 1
To bait a Krippled Anchovy, slide the plastic head up the leader approximately 6 inches away from the hook(s). Pull the red plastic pin from the holes in the head. Insert the bait snugly into the plastic head cavity—make sure the back of the bait is on the same side as the leader exit hole on the nose.
With the bait forced tight into the head cavity, hold the red pin by the ball end and insert the point into the round hole. Push the pin straight down through the bait and out the lower hole (Fig. 1).
To ease entry of the pin into frozen bait, make a dry run with a dry toothpick. Place the sharp end of the toothpick in the round hole and push it down through the bait and out the other side. Then, insert the red pin into the hole made by the toothpick.
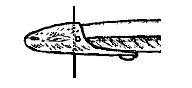 Figure 2
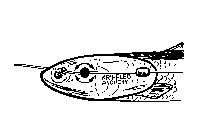 Figure 3
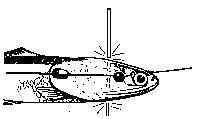 Figure 4
After the bait is secured by the red plastic pin, you may further secure it by placing a toothpick through the bait and the holes in the top and bottom of the plastic head. Always break toothpicks off clean.
Setting the Hook
While supporting the baitfish, insert the hook into the side of the bait. Enter the hook high on the bait’s side, where the silver meets the blue—approximately 1.5 to 2 inches from the end of the tail (Fig. 5). The shank of the hook should lie flat against the bait. In a tandem rig, the rear hook should hang free at the tip of the tail (Fig. 6).
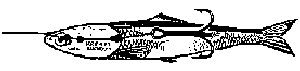 Figure 5
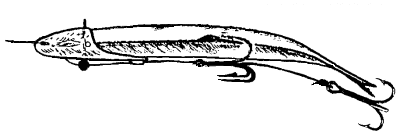 Figure 6
Carefully curve the bait toward the hook side—the tail end must curve inward. Hold the plastic head in one hand and gently pull the leader to take up slack between the blister and hook. This will place the needed curve in the bait.
If the bait is fresh, fat, or soft, you may need to push a dry toothpick into the flesh just under the skin in the tail region. Do this after the hook is placed and the tail is curved inward. The toothpick will help hold the curve in place (Fig. 7 & 8).
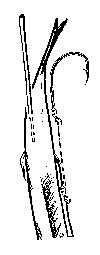 Figure 7
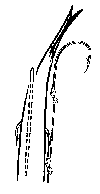 Figure 8
Threading a New Leader
Thread the end of the leader through the rear blister, then through the red pin and oval hole. Point the leader to exit at the rear of the head cavity. Loop the leader end around and lead it back into the cavity, exiting through the nose hole (Fig. 9).
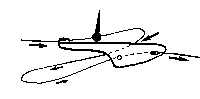 Figure 9
Replace a toothpick point in the blister to create a friction stop. Push a dry toothpick point into the blister hole alongside the leader until snug, then break the ends off clean. Replace the toothpick if the leader begins to slide too freely. Do not push the toothpick too far—you'll burst the blister. The leader only needs to be snug.
Tips for Success
- Always use firm, straight, bright bait, kept moist and cold.
- Troll at speeds of 2–3 knots, with bait revolutions of 1–2 per second.
- The desired action is a moderately slow spiral roll.
- If using a dodger or flasher, choose one at least 11 inches in length.
- Always sharpen your hooks—and keep them sharp.
- Always test your rigged bait for correct action alongside the boat before fishing.
